Using DbUp to Package Database Change Scripts
In the previous post, we took a look at some popular strategies for updating database schemas, including using database change scripts. In this post, we’ll focus on using DbUp, an open-source tool, to package and deploy change scripts. This is the sixth post in a series about using Octopus Deploy.

Using DbUp, In a Nutshell
The project page for DbUp on nuget.org simply states:
DbUp makes it easy to deploy and upgrade SQL Server databases by running change scripts.
They aren’t kidding. Using DbUp turns out to be super simple. At first I expected that for this post I’d simply describe step-by-step how to use DbUp to implement a change script strategy. But there is already an excellent article on the Octopus Deploy blog that goes over all this (and more.) The info about DbUp starts about a quarter of the way down the page, and has lots of screenshots.
A more compact article can be found on the home page of the DbUp documentation itself. Either of these articles might tell you all you need to know on this topic. As a result, I’m not going to repeat all that here. But still, let’s summarize the basic steps:
- First, use Visual Studio to create a console app.
- Next, import the DbUp Nuget package.
- Add a Scripts folder in the VS project.
- Create and add change scripts to that folder, marking them as Embedded Resources.
- Copy a few lines of code into the Main() method (we’ll be expanding on this in the rest of this post.)
- Set a connection string in app.config.
- Build and then execute the new console app.
- Finally, look in the targeted database and verify that your changes were applied.
- Done!
None of this is difficult, so far. And the beautiful thing about packaging this as a console app is that it can be executed anywhere – there is no dependency on Octopus Deploy. As a result, not only is this approach highly testable, it also means that you can use DbUp even if you don’t use Octopus at all.
Let’s Do That Again!
In the list above, Item 5 mentions the Main() method. To get up and running quickly, you can copy the Main() method from either of the pages linked in the previous section. Both those articles show just about the simplest thing that will work. If your needs are simple, this may be all you’ll ever need. The DbUp package provides a nice fluent interface, and the code is very straightforward. In the simplest scenarios, using DbUp can be pretty much of a slam dunk.
In my case, I started out by copying the entire Main() method directly from the DbUp website. The first time that I ran the resulting console app, everything worked great! Fantastic! However, the second time I tried it for real, my database ended up in a bad state. Sad! So what happened?
I Read It in Somebody’s Journal
One of the benefits of using DbUp is journaling. While DbUp is running a script, it adds the name of each script to a special SchemaVersions table. This feature ensures that a given script only runs one time against a database instance, no matter how many times you might run the console app.
This is a great feature, and it implies that your change scripts are not required to be idempotent. Another benefit is that, if you ever want to know which scripts have been applied to the database to reach its current state, you can simply query this table.
However, my company’s deployment process works differently from some. In our case, for each environment below Production, we take last night’s backup of the Production database, copy it to the non-Prod server, and then apply our set of change scripts. Some of these scripts, of course, make the desired schema changes.
Keeping It Fresh
Others scripts though, which we call PostRefresh scripts, change the Production application settings, for example, to their non-Prod equivalents. We also have a script called Version.sql, which we use to record a row in a table named DbVersion each time that we deploy. The contents of this table gets reflected on each application’s Version page. We need these PostRefresh scripts to run every time we deploy.
Using DbUp, our PostRefresh scripts ran just fine – that is, right until they had been deployed to Production for the first time. After that, because of the journaling feature and the fact that these scripts had been previously “seen” by the database, DbUp prevented the scripts from running again. While this is perfect for our ordinary scripts, for the PostRefresh scripts this is NOT what we needed. So what to do?
Let’s Just Pretend That Never Happened
Fortunately, DbUp also has the concept of the NullJournal. While the NullJournal is in use, the names of the scripts are not written to the SchemaVersions table. Instead, the names of these scripts go straight to the bit bucket. Now these scripts will run every time, over and over. Perfect!
Before we could do this though, we needed to let DbUp know on which scripts to skip the journaling. Since we already referred to these as the PostRefresh scripts, we decided to take a convention over configuration approach. Under this new convention, the name of each such script now starts with the phrase “PostRefresh_” – and not forgetting about Version.sql – we ended up with the IsAlwaysAppliedScript() method shown below in Script 1.
    static bool IsAlwaysAppliedScript(string s)
    {
        return s.StartsWith(BaseScriptName + "PostRefresh_")
               || s.Equals(BaseScriptName + "Version.sql");
    }
Making Use
Now that we had that code for selecting the right scripts, we still needed to use it, of course. So next we modified the Main() method that we ripped off the DbUp documentation site. As you’ll note, the first half of this method is a straightforward copy of the code from the DbUp documentation site, with a minor modification. The second half is also pretty much of a copy, but this time using the Null journal.
If you’ve looked at the scripts from those previously-mentioned sites, then most of this should look pretty familiar. So we’re not going to do a line-by-line analysis here. But let’s look at the most important changes. Lines 11 through 17 of Figure 2 should look very similar to what you’ve seen before. But, you’ll notice that on line 15 we’re calling the IsAlwaysAppliedScript function (using the negation operator.) This of course is designed to apply the “regular” change scripts.
On lines 46 through 53, we’re basically repeating this same method chain, but this time, on line 51 we are setting up use of the NullJournal. In this method chain, on line 50 we call the IsAlwaysAppliedScript method once again, this time without the negation. (In this case, we’re making the call using method group syntax.) And as expected, this is where we are setting up to apply the PostRefresh scripts to the database (which actually takes place on line 55, with the call to the PerformUpgrade() method.) Easy.
public class Program
{
    private const string BaseScriptName = "App.DbUp.Scripts.";
    private const string ConnectionStringName = "AppConnection";

    static int Main(string[] args)
    {
        var connectionString = args.FirstOrDefault()
                               ?? ConfigurationManager.ConnectionStrings[ConnectionStringName].ConnectionString;

        var journaledScripts = DeployChanges.To
                                            .SqlDatabase(connectionString)
                                            .WithScriptsEmbeddedInAssembly(
                                                Assembly.GetExecutingAssembly(),
                                                s => !IsAlwaysAppliedScript(s))
                                            .LogToConsole()
                                            .Build();

        string message;
        if (!journaledScripts.TryConnect(out message))
        {
            Console.ForegroundColor = ConsoleColor.Red;
            Console.WriteLine(string.Format("Connection to database using {0} failed!", connectionString));
            Console.WriteLine(message);
            Console.ResetColor();
#if DEBUG
            Console.ReadLine();
#endif
            return -1;
        }

        var result = journaledScripts.PerformUpgrade();

        if (!result.Successful)
        {
            Console.ForegroundColor = ConsoleColor.Red;
            Console.WriteLine("Failure applying change scripts!");
            Console.WriteLine(result.Error);
            Console.ResetColor();
#if DEBUG
            Console.ReadLine();
#endif
            return -1;
        }

        var nonJournaledScripts = DeployChanges.To
                                    .SqlDatabase(connectionString)
                                    .WithScriptsEmbeddedInAssembly(
                                        Assembly.GetExecutingAssembly(),
                                        IsAlwaysAppliedScript)
                                    .JournalTo(new NullJournal())
                                    .LogToConsole()
                                    .Build();

        result = nonJournaledScripts.PerformUpgrade();

        if (!result.Successful)
        {
            Console.ForegroundColor = ConsoleColor.Red;
            Console.WriteLine("Failure applying PostRefresh scripts!");
            Console.WriteLine(result.Error);
            Console.ResetColor();
#if DEBUG
            Console.ReadLine();
#endif
            return -1;
        }

        Console.ForegroundColor = ConsoleColor.Green;
        Console.WriteLine("Success!");
        Console.ResetColor();
        return 0;
    }

    static bool IsAlwaysAppliedScript(string s)
    {
        return s.StartsWith(BaseScriptName + "PostRefresh_")
               || s.Equals(BaseScriptName + "Version.sql");
    }
}
Getting Connected
One final detail we need to cover is how to get connected to the database. For this, as you might guess, we’ll need a connection string.
Returning to Script 2 for a moment, you can see that on line 8 of Script 2, we first attempt to get a connection string from a command-line argument. And of course we can certainly do that. When lacking that, however, then we fall back to getting a default connection string from app.config, as seen on line 9.
To do that, we need to add a ConnectionStrings section to app.config. Script 3 covers the needed settings. Once we have that in place, the code on line 9 will grab that string, assuming that you are looking for a matching connection string name.
    <connectionStrings>
        <add name="AppConnection" connectionString="Server=<redacted>;Database=<redacted>;Integrated Security=True;Trusted_connection=SSPI" />
    </connectionStrings>
I’m certainly no expert in all the ins and outs of connection strings, but I had a slight challenge getting to a string that worked. The string shown in Script 3 uses the “Trusted_connection=SSPI” syntax variant. This ended up being rather different to the connection string that our application uses from IIS (DataSource=; InitialCatalog=; etc.) So I’ll leave you here with a hearty “good luck!” I have no doubt you’ll figure out something that will work for your situation!
Finally, I can hear some of you thinking “I might want to put the name of my DEV database server here, or perhaps of my PRD server; as I promote this up, how do I deploy to the correct server?”
One answer is, of course, that using the command-line parameter is always an option. However, a future article in this series will cover how Octopus Deploy does app.config (and other) transforms, by applying environment-scoped variables at deploy time.
What Could Possibly Go Wrong?
Earlier in this post I said, and I quote:
The first time that I ran the resulting console app, everything worked great!
I lied.
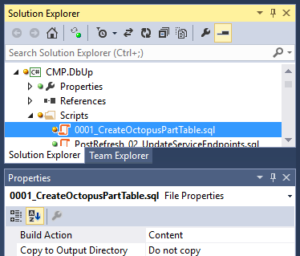
In item 4 of the step-by-step list near the beginning of this article, I very briefly mentioned that when adding change scripts to the Scripts folder, that they must be marked as Embedded Resources. When you first add a script to your Visual Studio solution, the properties of the script will probably look as shown in Figure 1 below. The Build Action of that new script will be set as Content.

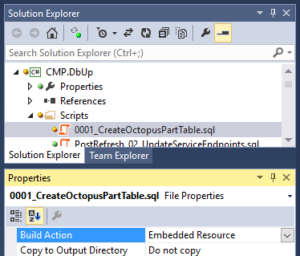
Instead, you’ll need to set the Build Action property as shown in Figure 2. If you don’t, the script file won’t be packaged in the executable, and it won’t be deployed.

The second time that I ran the resulting console app, everything worked great!
The third time, not so much again. You’ll have to remember to set that Build Action property for every single script that you add.
Using DbUp with Octopus Deploy
After working our way through all the prerequisites above, we now have an executable console app that can deploy database change scripts. But the whole point of this series of blog posts is how to deploy an application using Octopus Deploy. This post hasn’t even discussed that yet.
So our next consideration is how to use this app within Octopus Deploy. Octopus has a lot of power. I have no doubt that we could find a way to execute our new console app inside an Octopus deployment step. But, perhaps surprisingly, one of the things that Octopus Deploy really likes to work with is NuGet packages. As a result, we’re going to want to package our executable for Octopus. I’ll get into what that means and an easy way to do that in the very next article.
Continuing On
The intent of this blog post was to provide information about using DbUp. DbUp is a simple tool for creating database upgrade packages that, among other things, are very compatible with Octopus Deploy’s capabilities. Here, we discussed using DbUp to create a console app that can deploy database change scripts.
This is the sixth post in the multi-part series – “Practical Octopus Deploy.” The focus of this series is from the perspective of a developer who wishes to use Octopus to deploy an application. The next post in this series discusses using OctoPack to create packages for deployment via Octopus. The first post of this series, with table of contents, is Practical Octopus Deploy – Introduction.
Additional DbUp Resources
This was a pretty long article. I had to stop somewhere, but I could have gone even longer.
In particular, there are many other tools and techniques available to accomplish a database upgrade. Originally I had a lot more material in here discussing some of those alternatives. I had to cut back to stay focused on the DbUp topic. Perhaps I’ll get that additional info out there in a future article.
- For an open source project, DbUp appears relatively professional. This makes sense, since the authors/contributors also happen to work for Octopus Deploy. So DbUp has a GitHub Page that describes and links to various resources, including documentation, NuGet packages, source code etc.
DbUp GitHub Page - Truly, there is not that much to DbUp. The documentation seems quite good. It is both complete and concise, in part because DbUp itself is very concise. It does one thing, and it does it well. The documentation reflects this.
DbUp Documentation Website - When you are ready to bring the DbUp NuGet package into your Visual Studio solution, you’ll probably just use the Package Manager Console or search in the Manage NuGet Packages UI. But if for some reason you’ve just got to look at the project on NuGet, you can find it here:
DbUp Package web page on NuGet.org - If you are really into it, the source code is also available. I couldn’t think of anything else it should do, so for me, I chose to just turn the key, start the DbUp NuGet package, and drive off. But maybe you’re the type that would rather rebuild the engine first. Or at least tear it apart and look at all the shiny pieces.
DbUp source code on GitHub.com