Creating Deployment Packages Using OctoPack
In the previous post, we took a look at DbUp – a tool to package and deploy database change scripts. In this post, we are going to check out another tool, OctoPack. We’ll be using OctoPack to help us create and publish packages in a format that Octopus Deploy can easily consume. This is the seventh post in a series about using Octopus Deploy.

An Octopus’ Garden – and Some Turtles
Octopus Deploy has many capabilities. But once I got into to it, eventually I found that three of the shiniest objects in the world of Octopus are:
- NuGet packages,
- PowerShell scripts,
- NuGet packages containing…PowerShell scripts!
I don’t know about you, but I like turtles.
The tool we are discussing in this post, OctoPack, provides a very simple, automated way to gather the output files from a Visual Studio project into a NuGet package. In turn, OctoPack itself comes in the form of a NuGet package. More turtles!
A Chewy NuGet Center
If you already are familiar with NuGet, you likely think of NuGet as providing .dll and package management for Visual Studio solutions, as well as hosting a repository for same. Certainly, those are some of NuGet’s main use cases.

However, Octopus thinks of NuGet packages perhaps a bit differently than what you’ve seen before. To Octopus, a NuGet package is simply a collection of files that it can manipulate and distribute – or “a basket of deployables” if you will. Keep in mind that at its heart, a NuGet package is little more than a glorified .zip file that contains a manifest, and that it may or may not include some PowerShell scripts that can be executed when the package is expanded. Octopus leverages these facts in ways you may not have considered.
Getting Started with OctoPack
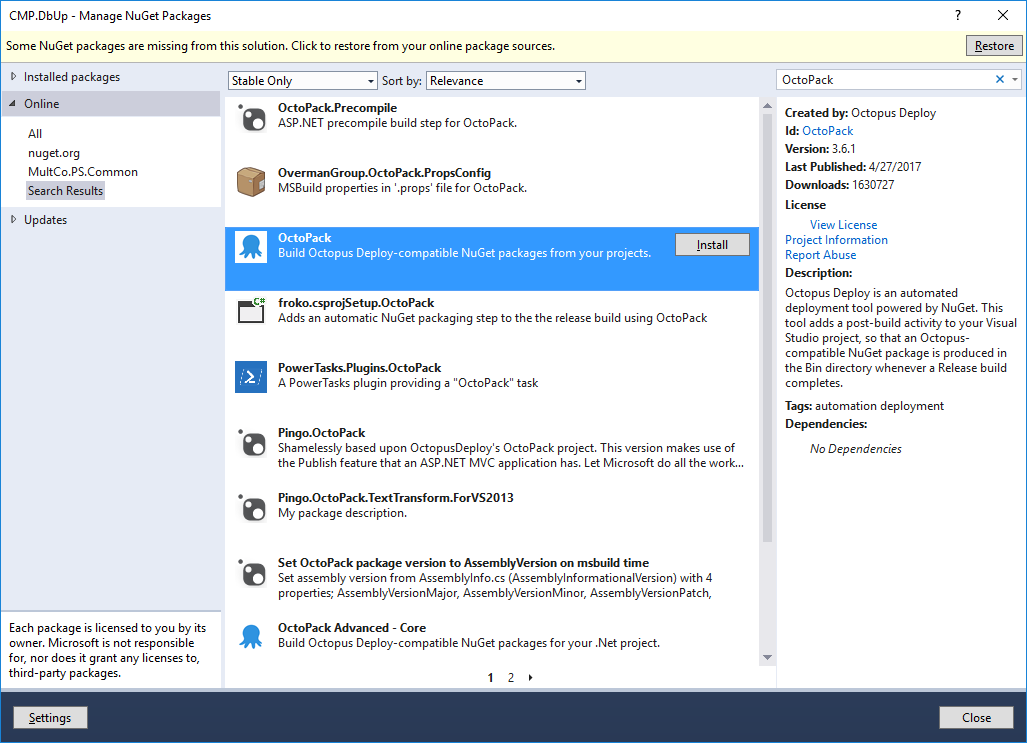
Before you can start using OctoPack, first you need to install the OctoPack NuGet package. Launch the NuGet Package Manager, and search for “OctoPack” (see Figure 1.) You’ll want to add OctoPack to any project that you will be publishing as an independent package. Usually this means your solution’s Startup Project, and often not much more than that.
Upon installing OctoPack, some new MSBuild targets become available, and a couple of new attributes will appear inside your .csproj files (see the highlighted lines in Script 1.)
<Target Name="EnsureNuGetPackageBuildImports" BeforeTargets="PrepareForBuild">
    <PropertyGroup>
      <ErrorText>This project references NuGet package(s) that are missing on this computer. Enable NuGet Package Restore to download them.  For more information, see http://go.microsoft.com/fwlink/?LinkID=322105. The missing file is {0}.</ErrorText>
    </PropertyGroup>
    <Error Condition="!Exists('$(SolutionDir)\.nuget\NuGet.targets')" Text="$([System.String]::Format('$(ErrorText)', '$(SolutionDir)\.nuget\NuGet.targets'))" />
    <Error Condition="!Exists('..\packages\OctoPack.3.6.1\build\OctoPack.targets')" Text="$([System.String]::Format('$(ErrorText)', '..\packages\OctoPack.3.6.1\build\OctoPack.targets'))" />
  </Target>
<Import Project="..\packages\OctoPack.3.6.1\build\OctoPack.targets" Condition="Exists('..\packages\OctoPack.3.6.1\build\OctoPack.targets')" />
  <!-- To modify your build process, add your task inside one of the targets below and uncomment it.
       Other similar extension points exist, see Microsoft.Common.targets.
  <Target Name="BeforeBuild">
  </Target>
  <Target Name="AfterBuild">
  </Target>
  -->
</Project>
Importantly, your .csproj will not be taking a reference on OctoPack.dll; it simply needs to define these additional MSBuild targets.
Creating a Spec(tacle) of Yourself
If you’ve ever created a NuGet package, then you are likely familiar with the .nuspec file. A .nuspec file is simply a manifest file containing metadata about a NuGet package. Every NuGet package has one.
Creating a .nuspec file is not difficult, but you do have to edit an .xml formatted file and get things just right. Fortunately, OctoPack is going to take a stab at creating that .nuspec file for us. OctoPack was created with this case in mind, and it knows how to read a .csproj file and find the output files. It will attempt to create a default .nuspec file that manifests all the files you need.
In many cases, this will be all that we need. However, if we need to customize the output, then we do still have the option of providing a .nuspec file of our own. OctoPack will happily consume a .nuspec fie if it finds one in your project. But we’ll talk more about that in a later article.
Let’s try the easy route first.
Automate All the Things
In our previous post, we created a DbUp console application. If we want to deploy that via Octopus Deploy, we’ll want to get that application into a package. We can do that by first installing OctoPack into our existing DbUp application.
OctoPack will pick up the console application and its few dependencies without requiring us to create a .nuspec file. The file still exists – it is simply that OctoPack automatically generates it for us at build time. So that is great.
But we are not actually going to install that console application as an application on our server, are we? Instead, what we want is for Octopus to run the console application one time so that our SQL change scripts are executed on the database server.
PowerShell Powers Hell
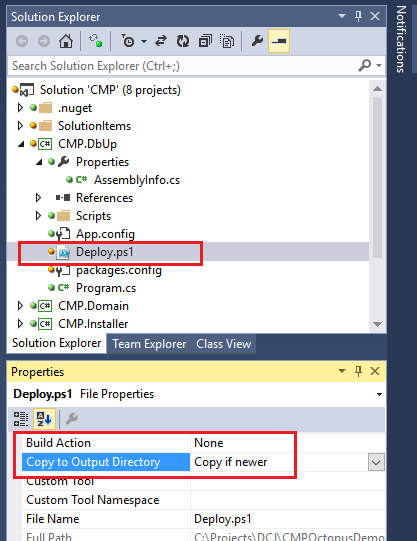
Fortunately, Octopus Deploy supports scripting. In particular, what we need is a small PowerShell script named Deploy.ps1. We can include that right inside our package, and then Octopus will run it automatically at the proper time. Let’s create that file (see Script 2.)
& .\CMP.DbUp.exe
That’s it! Of course, for this to work, the name of our application must be CMP.DbUp.exe. At deployment time, all that little PowerShell snippet is going to do is look for our executable in the same folder as the PowerShell script, and then run it.
We do need to add that script to our Visual Studio project, and then set the build properties to include it in the package (Figure 2.)
Wrapping It Up in a Neat Little Package
We need to do one more thing, and that is to tell MSBuild to create the package. That is fairly simple as well. If we are building from the command line, we can simply pass an additional property to the build command (see Script 3.)
msbuild <MySolutionFile>.sln /p:Configuration=Release /p:RunOctoPack=true
As simply as that, we should now find a .nupkg file containing the contents of our .csproj output. This file will probably be found somewhere in our Bin folder.
Killer (N)Ants
In my situation, I’m using NAnt build scripts. While I have no intention of turning this post into a full-fledged NAnt tutorial, it is quite simple to call OctoPack from a NAnt script. First, I copied my existing Build target (starting from line 184 in Script 4.) Then I pasted and modified it into a new BuildAndPack target (starting at line 198, with interesting lines highlighted.)
<target name="Build" depends="getVersion">
    <fail unless="${property::exists('BuildConfig')}" message="Property 'BuildConfig' not set."/>
    <fail unless="${property::exists('BuildTarget')}" message="Property 'BuildTarget' not set."/>
    <fail unless="${property::exists('build.version')}" message="Property 'build.version' not set."/>

    <exec program="${MSBuildPath}" verbose="true">
        <arg line='"${SolutionFile}"' />
        <arg line="/property:Configuration=${BuildConfig}" />
        <arg value="/target:${BuildTarget}" />
        <arg value="/verbosity:minimal" />
        <arg value="/nologo" />
    </exec>
</target>

<target name="BuildAndPack" depends="getVersion">
    <fail unless="${property::exists('BuildConfig')}" message="Property 'BuildConfig' not set."/>
    <fail unless="${property::exists('BuildTarget')}" message="Property 'BuildTarget' not set."/>
    <fail unless="${property::exists('build.version')}" message="Property 'build.version' not set."/>

    <exec program="${MSBuildPath}" verbose="true">
        <arg line='"${SolutionFile}"' />
        <arg line="/property:Configuration=${BuildConfig}" />
        <arg line="/property:RunOctoPack=true" />
        <arg value="/target:${BuildTarget}" />
        <arg value="/verbosity:minimal" />
        <arg value="/nologo" />
    </exec>
</target>
Finally, in order to build my new package, I simply pass the new BuildAndPack target at the command line when calling my build script.
But I Like My NuGet GUI
I hear some of you saying “I don’t like command lines. I just want to stay in Visual Studio where I don’t have to remember anything. LMAO!” Well, good news! I’ve got you covered too.
Another option for using OctoPack is to add a new configuration to your Visual Studio solution that will create the packages for you. You won’t ever need to leave the comfort and safety of Visual Studio. Let’s see how that might look.
It (Con)figures!
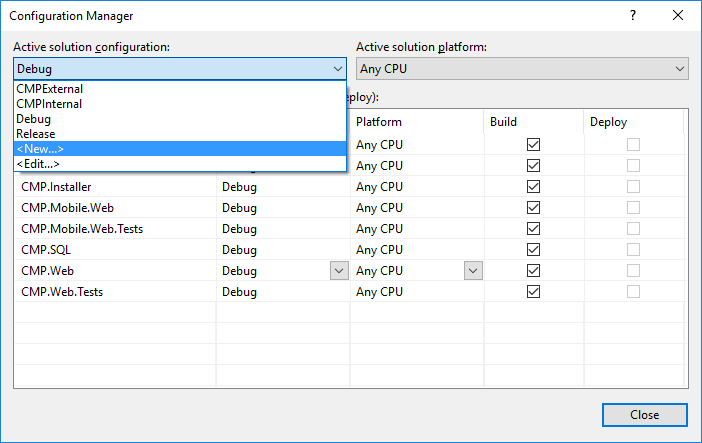
In Visual Studio, first open the Configuration Manager, accessible from the Build menu, or by right-clicking the Solution node in Solution Explorer. Then add a new Solution Configuration (Figure 3.)
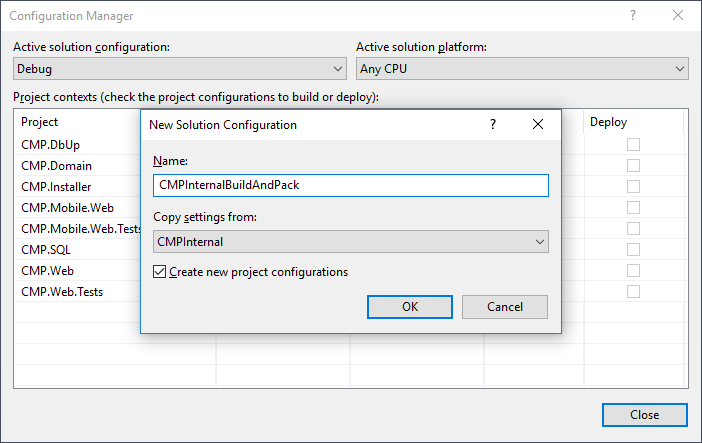
If you have a configuration that is already set the way you need, in terms of projects and build order dependencies, the easiest thing is to copy from that existing configuration (Figure 4.) Often, this might be the Release configuration. Otherwise you can just set up a new configuration from scratch.
This will add some lines to your .csproj files that will resemble the following (naturally, you will see whatever name you chose for your new configuration in your project):
  <PropertyGroup Condition="'$(Configuration)|$(Platform)' == 'CMPInternalBuildAndPack|AnyCPU'">
    <OutputPath>bin\CMPInternalBuildAndPack\</OutputPath>
    <DefineConstants>TRACE</DefineConstants>
    <Optimize>true</Optimize>
    <DebugType>pdbonly</DebugType>
    <PlatformTarget>AnyCPU</PlatformTarget>
    <ErrorReport>prompt</ErrorReport>
    <CodeAnalysisRuleSet>MinimumRecommendedRules.ruleset</CodeAnalysisRuleSet>
  </PropertyGroup>
Tying It All Together
Once you have this new configuration in place, the next thing you’ll want to do is add some OctoPack properties. So you will have to do a bit of editing to make the new configuration start working with OctoPack.
First, right-click on the node of your project in Solution Explorer, and then click Unload Project. You will now be in a standard IDE editing window, looking at the XML of your project file. We’ll want to add the new line highlighted in Script 6.
Finally, save the file, then right-click the project node again and Reload Project. Select your new configuration from the Build menu bar (see Figure 10.) Build the project, and you should now find a NuGet package in your output folder. Whew!
  <PropertyGroup Condition="'$(Configuration)|$(Platform)' == 'CMPInternalBuildAndPack|AnyCPU'">
    <OutputPath>bin\CMPInternalBuildAndPack\</OutputPath>
    <DefineConstants>TRACE</DefineConstants>
    <Optimize>true</Optimize>
    <DebugType>pdbonly</DebugType>
    <PlatformTarget>AnyCPU</PlatformTarget>
    <ErrorReport>prompt</ErrorReport>
    <CodeAnalysisRuleSet>MinimumRecommendedRules.ruleset</CodeAnalysisRuleSet>
    <Prefer32Bit>true</Prefer32Bit>
    <RunOctoPack>true</RunOctoPack>
  </PropertyGroup>
Unwrapping the Package
Now that we have a NuGet package, you may want to verify that your package has the files that you think it should. Or maybe you’re just a curious sort, like me. So, you might be anxious to get a look inside your new package.
It’s important to remember that a NuGet package is little more than a glorified .zip file. There are (at least) a couple of ways to get a look inside:
- Rename the file to a .zip extension, then use .zip file tools/techniques to peek inside.
- Use NuGet Package Explorer.
In my opinion, NuGet Package Explorer gives a slightly cleaner and nicer view inside the package. I’m not going to show this, but you can learn more about NuGet Package Explorer here. At the time I’m writing this article, this tool is available in several ways – listed on the Windows App Store, can be installed via ClickOnce or via chocolatey, etc. Take your pick. Who knows what will be in vogue by the time you read this?
Continuing On
The intent of this blog post was to provide information about using OctoPack. OctoPack is a simple tool that can be added to a Visual Studio project, is very easy to use, and is useful for creating NuGet packages from the project output. In turn, these NuGet packages are quite compatible with Octopus Deploy’s capabilities.
Here, we discussed using OctoPack in its simplest, out-of-box form. In the next post, we’ll be taking a look at some slightly more advanced features, including using OctoPack to publish directly to a NuGet feed of your choice.
This is the seventh post in the multi-part series – “Practical Octopus Deploy.” The focus of this series is from the perspective of a developer who wishes to use Octopus to deploy an application. The next post in this series discusses more advanced usages of OctoPack to create packages for deployment via Octopus. The first post of this series, with table of contents, is Practical Octopus Deploy – Introduction.
Additional OctoPack Resources
As always, I’m standing on the shoulders of giants when I write a post like this. Of course, there is a lot of additional material on the internet that I found useful when I started to explore using OctoPack.
- OctoPack was specifically designed to help create Octopus-ready NuGet packages. It is an open source project, so naturally it has a page on GitHub.
OctoPack GitHub Page -
Just like DbUp, OctoPack is built and maintained by the Octopus Deploy team. So of course it is mentioned and documented on the Octopus Deploy documentation web pages.
Octopus Deploy Documentation – Using OctoPack - Some folks would rather watch a video instead of reading an article. Here’s a brief, informative video about using OctoPack, from the makers of Octopus Deploy.
Octopus 2.0 part 7: Using OctoPack (00:03:10) - In this post, I talked about including a file named Deploy.ps1 inside a NuGet package. This allows some PowerShell to run when the package is deployed. There are some other scripts that can be included that run before or after deploy, or when the deploy fails.
Octopus Deploy Documentation – Custom Scripts – Scripts in Packages