Understanding Octopus Deploy Lifecycles
The previous post in this series discussed environments and roles in Octopus Deploy. In this post, we’ll examine Octopus Deploy lifecycles, lifecycle phases, and how they control deployments. We’ll also see how a lifecycle phase contains and interacts with Octopus environments. This is the third post in a multi-part series about using Octopus Deploy.
Typically, a web application deploys through several stages on its way from development to production. In Octopus, the lifecycle allows control and enforcement over a logical promotion model.
According to the Octopus documentation, lifecycles ensure that promotion models are followed. Lifecycles prevent deploying to Production before deploying to Test. In addition, a lifecycle can also help promote deployments to various environments automatically. Finally, an Octopus lifecycle can define a retention policy. A retention policy allows previous releases to remain available for re-deployment for some period of time.
Hopefully It’s Only a Phase
Each lifecycle consists of one or more lifecycle phases. In turn, each phase deploys to one or more environments. Consequently, lifecycle phases define and control a promotion model.
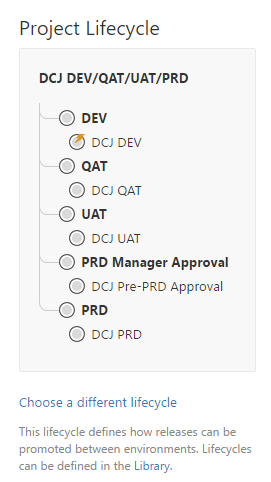
The simplest lifecycle possible contains a one-to-one correspondence between each lifecycle phase and each environment. For example, you could associate a DEV environment with a DEV phase, a QAT environment with a QAT phase, and so on (see Figure 2.) But phases are not to be confused with environments.
For example, consider an organization that uses a continuous deployment model. In addition, perhaps they have four environments – let’s say DEV, Test, Staging, and Production. It’s quite possible in this case to define a two-phase lifecycle. You could create a first phase, such as Integration, that could deploy to DEV, Test, and Staging simultaneously. A second (and final) phase could deploy to Production.
In Figure 2, the lifecycle phase names are the top-level nodes in the tree, shown in bold print. The environments appear in the tree as sub-nodes, indented and in standard print.
Keeping the Environment Clean
Octopus allows for multiple lifecycles (Figure 3.) Each phase in a particular lifecycle pertains to one or more environments. In turn, as we’ve seen in the previous post on environments and roles, each machine in an environment plays one or more roles.
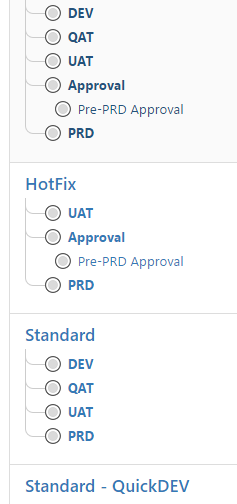
In the above figure, notice that while some of the lifecycle phases appear to contain an environment, most do not. In fact, though, all do. If an environment name exactly matches the phase name that contains it, then it is not displayed in the tree. For example, each phase named UAT in each of the example lifecycles in Figure 3 contains an environment also named UAT. You simply can’t see the environment name.
Each project you create in Octopus Deploy will have a lifecycle. In this manner, the lifecycle controls which environments, which roles, and thus which machines that a particular deployment project targets.
Solitary Confinement
A lifecycle attaches to a specific set of roles, environments, and target machines. As a result, a lifecycle can provide an additional layer of isolation between sets of infrastructure. According to the Octopus Deploy documentation:
By default, a project can be deployed to any environment. You can limit which projects can be deployed to which environment using lifecycles. This is useful if you have one set of environments for projects developed by one team, and another set of environments for projects developed by another team.
This key bit of information strongly supports the notion of isolating departmental infrastructure into specific environments. Each department could then have its own specific set of lifecycles to use in its deployment projects.
Continuing On
The intent of this blog post was to provide enough background information about Octopus lifecycles to a developer who is new to Octopus Deploy. Just as with environments and roles, Octopus Deploy lifecycles enable power and flexibility in defining your deployments. You can set up and name lifecycles and lifecycle phases in any manner you desire.
Octopus lifecycles have additional features that this post does not discuss. For this reason, I plan to revisit and expand on this topic in a future post.
This is the third post in the multi-part series – “Practical Octopus Deploy.” The focus of this series is from the perspective of a developer who wishes to use Octopus to deploy an application. The next post in this series discusses Octopus Deploy projects and project groups. The first post, with table of contents, is Practical Octopus Deploy – Introduction.
Additional Resources
Some people can never get enough of a topic.
- For further information about Octopus Lifecycles, you may want to check out the official documentation:
Octopus Deploy Documentation – Lifecycles